Showing posts with label weddings. Show all posts

Monday, March 17, 2014

the time we went to a wedding (an outfit post + my new business venture + weekly wishes).

we had a busy weekend over here. friday night we had the privilege of attending the wedding of my dear friend shannon to her new husband jacob, saturday we went to the zoo, and then yesterday there was potluck lunch after church. needless to say, im really surprised that i did anything today, let alone all the chores + errands + shoe shopping (which ended up turning into an extended visit to the mall) PLUS getting a bomb diggity dinner on the table at a somewhat decent hour (seriously guys, this pizza will make you never want to eat a different pizza ever again. i just wish i could have a chance to try it on real bread). 

its been a pretty exciting and productive day, to say the least. although my work work, like writing blog posts and sewing the pile of the soon-to-be-announced new product for the shop... well, lets just say alice just went to bed and im just now getting started. but, better late than never, right? i hope so. 

anyway, heres what i wore to shannons wedding:


outfit details:

dress: vintage
shoes: aldo (thrifted, originally purchased for my wedding)
necklace: macys
glasses: zenni optical
purse: voz collective (from back in the old days when jackie made purses)
nails: jamberry in diamond dust sparkle and cup of tea

first off, i just want to clarify that even though this dress totally looks like a bridesmaids dress (and just so happens to be the exact color of the wedding theme) i was not in the wedding. 

the bride did pick my dress though. 

for real. a few weeks ago shannon texted me saying "hey i got you this green silk saks fifth avenue dress from the last chance goodwill. it needs some repair on the zipper but it looks like your size and its just too nice to get shipped to africa and its only $2". so obviously i was like "heck yes". 

and then i actually saw the dress and i was like "HOLY MOLY ARE YOU KIDDING ME THIS IS THE MOST BEAUTIFUL DRESS IVE EVER LAID EYES ON WHY ARE YOU GIVING IT TO ME FOR FREE AND NOT SELLING IT ON ETSY FOR THREE THOUSAND DOLLARS" and then i was like "i know its probably too fancy and the exact color of your wedding but can i still wear it to the wedding anyway", and being the absolute doll that she is, she said "of course"

but seriously. its the most beautiful dress ive ever seen, from the shimmery, swishy silk fabric to the impeccable construction (the fashion nerd in me just about DIED when i saw that the lining was HAND SEWN into the bodice so the stitching wouldnt show, you just dont see that in dresses these days). oh, and did i mention it actually fits? vintage dresses NEVER fit me right. ive got broad shoulders and a deceptively large ribcage and no matter how hard i try, vintage dresses just will not zip for me. but this one did. perfectly. 

obviously with such an amazing dress i didnt want any accessories to distract from it, so i just paired it with some plainish pumps and pearls and a simple hairdo. oh and this really awesome clutch that i got at a craft fair back when i used to do lots of cool craft fairs that i thought was lost for like two years but then i found it in a suitcase while i was cleaning a couple weeks ago and it was the best day ever. 

now, if youre really observant, you probably noticed that i included my nails in the outfit details, which ive never, ever done before. this is going to become a regular thing. and theres a reason for this. its because i just started on a new business adventure (i just decided right now that i like that word better) as a consultant for jamberry nails! obviously im going to tell you more about this later (spoiler alert: theres going to be a giveaway involved in my launch party thats happening next week), but for now ill just say that these are BY FAR the BEST nail wrap product that has EVER existed and you need to check them out RIGHT NOW (and also take this enthusiasm seriously because im literally never this excited about a product ever). you can learn more about them here (and obviously stay tuned for my launch party next week!)

oh! and remember how theres nothing new in the shop right now because i was too busy making bow ties and pocket squares for a wedding? well this was the wedding. i thought i should have something to show for this prolonged absence, so heres the adorable groom sporting his poverty luxe accouterments:


and as for weekly wishes? well i definitely made good on last weeks wishes: i filled out and turned in my financial aid appeal form (now im anxiously awaiting the verdict...) PLUS i updated my name change AND checked out the book lists for my classes. also, today i tried on running shoes (i havent made a decision yet though, these were lightweight and comfortable, but these were even better, though i dont know if they were fifty dollars better). also also, i got a big pot of cream of asparagus soup in the freezer AND we took alice to the zoo (and those werent even on the list for this week!), so marchs monthly wishes just may be completed after all!

this weeks goals are to get one more batch of beans in the freezer, decide on and order/buy my running shoes, and go get my student id (i couldnt do it last week because the name change takes a few days to process). should be a fun week. 

what are your goals for this week?

Button

Tuesday, September 3, 2013

our wedding.

james and i will be celebrating our third anniversary tomorrow, and in honor of the occasion i thought id share some of the highlights of our wedding, as shot by my wonderfully talented cousin valerie patterson (you can see more of her work here):

we got married in jamess grandparents backyard, in a decidedly nonchalant (but still wedding-ey) affair. we were going for a simple, old fashioned backyard wedding, inspired by the types of weddings you see in photos from the 20s and 30s, where everyones all serious and dressed in black and it kind of looks like a funeral. the kind of wedding with a short, to the point ceremony and then some snacks and maybe some pictures and then everyone goes home. the kind of wedding that causes severe family drama over its lack of personalized place settings, designated seating, party favors, a dj, candy buffet, decorations, open bar, rented dance floor, extended family portraits, rented tuxedoes, matching bridesmaids dresses, unicorns and a steak dinner. 

the kind of wedding where multiple relatives flip out that i did my own hair and makeup:


(hey, i do my hair and makeup every day, if anyone can do it right, its me. i dont care what day it is)

and thats exactly what we had, on what was supposed to be a cool and pleasant labor day weekend, but actually was the record setting hottest september 4th ever in the history of lakeside california. im not kidding. aside from that, and some other small setbacks, like running out of water and my pastor being two hours late and certain guests stealing the toasting wine, and that i was recovering from what im pretty sure was strep throat, it was our perfect dream wedding. 

our perfect dream wedding, shot by my lovely cousin on my favorite kind of film without even having to ask. and film alone. thats right, our entire wedding was shot on 6 rolls of lomo 200, nothing digital. and i am still SO happy about this decision. honestly im kind of glad it was so bright and hot because of how pretty the light was how dreamy our photos turned out and gosh i sound like such a photo nerd right now. 

AND this house was perfectly designed for an outdoor wedding, with a zigzag path leading to the yard from the pool house:


down to the gazebo where we made our vows:


the ceremony was intentionally very short and basic, i was TERRIFIED of having 150 people looking at me, so we just had our vows, no scripture readings, no contract signing, no unity candles, just vows. and i completely stand by this decision. 

and after that, while we took a few minutes to cry and then compose ourselves before taking our wedding party pictures, all the guests were invited to eat a light afternoon tea of crumpets with assorted sweet and savory toppings while we took our bridal party portraits. i really, really wish we had gotten some pictures of the food, because people still tell us how much they loved the food at our wedding, but unfortunately our photographer was a bit busy, you know, taking pictures of us: 


our bridal parties were a little funny too, james had his five closest friends, with his longtime best friend jonothan as best man, while i had my two sisters (age 16 and 9) and three best friends (one of them being male) all serving as equal bridesmaids with no maid of honor. but i was also wearing a dress i bought off the rack at nordstrom so i think we all know by now that i was terrible at bride-y things. 

when we finished with the group pictures james and i went up to the pool house to take our bride and groom portraits:


this one in front of jamess grandpas vintage coke machine has always been my favorite (i mean seriously, HOW PERFECT WAS THIS HOUSE), and since i know youre dying to know, my dress was sue wong, from her alice in wonderland collection (i saw it in harpers bazzar right after getting engaged and HAD to have it, thankfully it was just from nordstrom and my  aunt offered to buy it for me), my veil was from etsy, the key necklace and feathers in my hair were from the renaissance fair, the pearl necklace was a bridal shower gift from my grandma, and my earrings were from claires. 

after portraits we re-joined the group for cake:


which rather than a traditional giant expensive "wedding" cake (which we ALL know is just regular cake at 500 times the price) we had a selection of homemade cupcakes in a variety of flavors (because it was REALLY important to me that nobody got stuck eating cake they didnt like):


if you havent put it together yet, this was a very hands-on, diy wedding (my mom did all the flowers AND the food, i hand folded envelopes for the invitations), and one of my most favorite handmade details were the little pieces of fondant i stamped with the custom stamp i had made (also from etsy) to top some of the cupcakes:


after cake james and i had our first dance (the only dancing at the whole wedding), to a sweet jack johnson song that he surprised me with:


 (i just want to take a moment and appreciate how perfect that picture is, is my cousin a genius or what?)

followed by a quick toast: 


 (this picture is probably my most favorite from the whole wedding, because in the back you can see that my sister had already changed into her bathing suit, because maybe i told people the wedding was also a pool party)

and then we left for a quiet, lazy honeymoon in downtown san diego. which was also perfect. 

looking at all these pictures and writing this post and remembering our wedding day has brought back so many sweet memories, especially of all the family and friends who helped out to make the day so special, and it has reminded me how glad i am that we did things the way we did, because by far my favorite memory of the day (that we dont have pictures of, obviously), was that, because the wedding was short and we checked into our hotel around 6, was that james and i got to go out for a nice, quiet dinner, by ourselves, on our wedding day. and i cant think of anything more perfect than that. 


Tuesday, April 9, 2013

framed embroidery tutorial, part two.

when we last left off, we had just finished step 8, and were all finished with the embroidery part, so now its time to move on to the framing part (click here for part one). for further reference we ended with this:


step 9: gently iron out any creases, the best way to do this is on the "medium" or "wool" setting, and with your fabric sandwiched between two towels to avoid damaging your hard work. now you can set that piece aside for a while because for the next few steps were going to be working making a backing for the frame. 

step 10: on a piece of stiff, non-corrogated cardboard (a cereal box is perfect), trace the INSIDE of the inner piece of your hoop, 


and cut it out, just inside of the circle you just traced (i didnt measure but it needs to be something like a millimeter smaller than the inside of the smaller hoop piece). so now you have a circle of cardboard that rests comfortable inside the back of your embroidery hoop, like this:


step 11: now trace this cardboard circle onto your batting, and cut out TWO circles of batting.


step 12: lastly, trace a circle onto your leftover embroidery fabric that has about a one-inch margin around your cardboard and batting circles. 


step 12: place ONE batting circle in the center of the embroidery fabric circle, and top with the cardboard circle, like this:


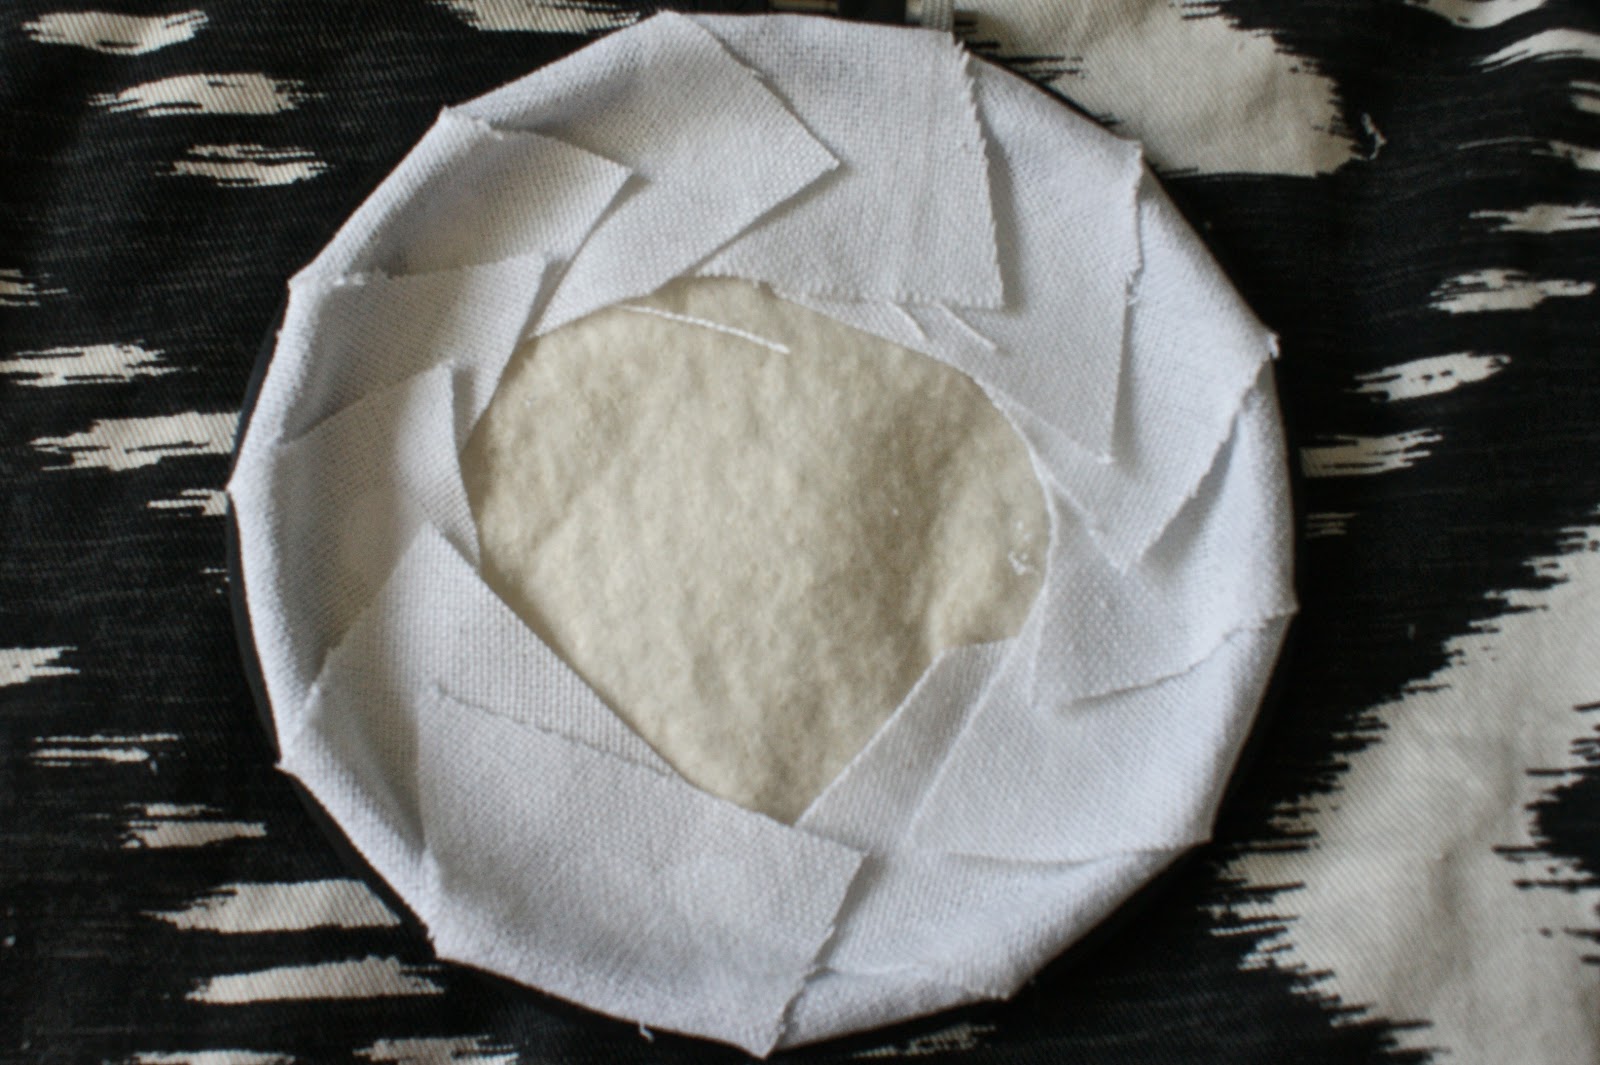
step 13: make small cuts in the margin of the embroidery fabric towards the cardboard circle, spaced about an inch apart (in retrospect, making more "slices" would have made a nicer edge). one by one, fold each "slice" toward the middle and secure with tacky glue (a glue gun would probably work better but i dont have one), like this:


and repeat...


until you have a nice little fabric-wrapped cardboard circle, like this:


step 14: now were going to return to our embroidered piece, and re-frame it in the hoop, this time making sure it is absolutely perfectly straight and centered. if needed, trim your fabric, leaving about a two inch margin. 


step 15: take your second batting circle and put it in the back of your hoop. this helps the front of the finished piece to have the "puffy" look one usually sees in this type of embroidery


step 16: "slice" the margins of the fabric, just like you did with the back piece, trimming if you need to (i left my margin way too big so i had to trim all of them)


 and fold them over the edge of the hoop and onto the batting, doing your best to keep the hoop edge as flat and smooth as possible. 


step 17: once the glue is dry, pop the wrapped cardboard into the back of the hoop, fabric side up. this hides the yucky back part and makes it look "finished".


and now youre done! 

the only thing left to do is hang it on the wall, or in my case, wrap it up and give it as a gift. (one of these days i promise im going to make one for us, i just can never get around to doing it). 


so there you have it, my very first ever craft tutorial. maybe someday ill do more? well have to see about that. 

Monday, April 8, 2013

framed embroidery tutorial, part one.


some friends of ours got married (named jenny and nathan, if that wasnt obvious already) last weekend, and i made this little framed embroidery piece for their gift, and i thought id share how to do it sinc its a holy trifecta of simple, inexpensive, and handmade without looking, you know handmade. this is kind of a long project (it took me two afternoons, a couple hours each), so im breaking up the project into two parts, first the embroidery part, then the framing, since thats how i broke it up when i made it, embroidery the first day and framing the second. 


heres what youll need:
(note: if youre the crafty type, you probably already have most of this, the only part i had to go out and buy for this was the hoop, but even if you had to buy every single thing it should run less than $20)
a six-inch embroidery hoop (joanns just got these really fancy black ones for $2.50)
evenweave embroidery fabric (about $6 for a package that will make 3 six inch framed pieces according to these directions)
embroidery floss in the colors of your choice
embroidery needles
disappearing marker
tacky glue
thin batting (i had leftovers from a blanket i made years ago, you only need a tiny bit)
thread snips
thin cardboard (not pictured, like from a cereal box or something) 
iron, ironing board, and towels (also not pictured)

and heres how you do it: 

step 1: start by tracing the inside of your hoop and sketching out your design. adding crosshairs will help with composition and symmetry. its ok if its not exactly perfect because theres LOTS of opportunity to refine it as you go. 


step 2: once youre happy with your design, stretch your fabric into the hoop, making sure the grain of the fabric is straight, and copy your design (and crosshairs if necessary) onto the fabric with your disappearing marker


step 3: cut a length of floss and begin to stitch over your design using a backstitch (or whatever stitch you choose), leaving a small tail of floss on the wrong side of your hoop and MAKING SURE NOT TO EVER KNOT YOUR FLOSS. if you make any knots theyll be super obvious when you frame it, so you need to be careful. 


 step 4: keep going...

and going...

until youve finished your first shape, like so:


step 5: trim your floss leaving a small tail, just like in the beginning. the back of your piece should be very neat and look almost the same as the front. 


repeat steps 4 and 5 with the rest of your piece, one section at a time, refining your design as you go...


starting a new piece of floss for each separate section, DONT use the same piece of floss to do two separate shapes, the little connecting piece WILL show when its all done. (note: you need to use VERY small stitches along curves)


keep going until youve embroidered your whole design, like so:


 step 6: when youre all done youll have a whole bunch of little tails hanging off the back like this:


so youre going to trim them close to the fabric (but not TOO close, about 1/8 of an inch will do) and secure with a dot of tacky glue, like this:

and give it a half hour or so to dry


step 7: remove the fabric from the frame and gently rinse the disappearing marker from the fabric with cold water, so the color from the floss doesnt bleed. be careful not to agitate the fabric either, since that could pull out some of your embroidery. 


step 8: let fabric air dry and take a much deserved break, and stay tuned for part two!