Showing posts with label beauty. Show all posts

Friday, August 28, 2015

alice in wonderland nail art tutorial (a guest post by taylor of posh polish nails).

Hi everyone! It's Taylor again :) I am back to share another fun nail design with you! As I mentioned in my first post, I came up with this design thanks to Victoria's daughter Alice! Side note : Can I just say how awesome Alice is? From what I read in Victoria's tweets and posts, she is a hilarious little girl. Can a three year old be my role model? Anyways, back to the reason I am here :) Today's nails are inspired by Alice in Wonderland! I have been wanting to try this design out for a while, and I thought this was a perfect time to do it! So without further ado, here are my nails!

  Alice in Wonderland NailsJust like my previous design, I will give y'all a step by step tutorial for each nail! Let's get started!

Index finger (Alice):

Polishes used:

Sally Hansen - White on and Lemon Shark Orly - Liquid Vinyl The nude is a Bolivian polish :)

Tutorial!

Start with a base of white. Paint a small portion of the tip with a nude polish. This doesn't have to be precise, you just need to make sure you have enough nude for her forehead. It is better to overdo it than not have enough because you will be covering up the excess in the next step! Using a yellow polish, paint two strokes above the nude, one to the right and one to the left. This will be Alice's hair. The next step is to outline her hair and add a bow, I recommend using a black polish for this step. Side note: I am awful at painting faces, which is why I chose to paint the top of her head instead of her face. Would you have guessed it was Alice? I was told it looked like a duck XD

Middle finger (Eat Me Tag):

Polishes used :

Loreal - Club Prive Sally Hansen - White on and Black Nail Art Pen And the grey is Bolivian :)

Tutorial!

Start off with any color base, I chose Club Prive because I love teal/turquoise polishes. This next step is optional, so feel free to get creative on this one! I chose to add grey polka dots to the base of Club Prive. Want stripes instead? Or would you rather it be plain? Go for it! Next paint the base of the tag with a white polish. I don't know why I made mine so small, especially since it was the only thing on the nail. I recommend making it bigger to at least fill half the nail, because it makes the next step so much easier. Now it is time to add the writing, see why it would be easier to have a bigger tag? I used a nail art pen by Sally Hansen because I find it makes it so much easier to write with than a nail art brush. The final step is to outline the tag to make it stand out against the background!

Ring finger (Pocket Watch):

Polishes used:

Orly - Liquid Vinyl Sally Hansen - White on The grey and gold are Bolivian as well :)

Tutorial!

Start off with a base of a dark color. I chose to use grey, but black or any other deep color would work. The next step is to paint the base of the watch. I recommend using a metallic color, as you can see I used gold. You can either use a nail brush or the polish brush to paint the base, use what is easier for you! Then using the same metallic polish and a dotting tool, add a big dot to the top of the watch, and slightly smaller dots to form a chain. The next step is to add smaller dots over the chain dots using your base color, to finish the chain. Using a white polish, paint the base of the face of the watch. The last step is to use a black polish to add all the small details, such as the hands of the clock.

Pinky (Cheshire Cat):

Polishes used :

Loreal - Hint of Lavender and Violette

Tutorial!

This nail is the easiest of all the designs. Start with a light purple/pink base, whichever you have that is closest to the Cheshire Cat's lightest color. This next step can be done two different ways. The first is to hand paint the stripes using a nail art brush. The second way is to use nail striping tape, which is what I used. If you have the striping, I recommend using it because you will achieve much cleaner and precise stripes than simply hand painting them. But if you don't have tape, no worries! Hand painted will still look good :) I finished all of these designs by using NYC Matte Me Crazy top coat. I wanted a matte finish, but if you prefer shiny nails, you can use a regular top coat! It is all up to you! 

There you have it! What do you all think? If you recreate this mani, I would love to see! Tag me on Twitter or Instagram so I can see! I want to thank Victoria for letting me share not just one, but two design's with you all! I had a lot of fun putting these together, I hope you guys enjoyed them!

Friday, August 21, 2015

adventure time nail art tutorial (a guest post by taylor of posh polish nails).

Hi everyone! My name is Taylor, and I am so excited to be guest posting for Poverty Luxe! Victoria has kindly given me the opportunity to write not just one, but two posts to share with you all! Before I begin, here is a little bit about me :) I am a nail blogger, I run a blog entitled Posh Polish Nails! I am currently living in Bolivia, and I love using inspiration from the world around me for my nail art! I will be sharing two different nail designs with you guys, one today and another on the 28th, and each will have a brief tutorial so that you can recreate it! Today's design is inspired by one of my favorite shows, Adventure Time! I recently discovered that Victoria and her family are also fans of the show, so I thought this would be the perfect design for this post! Here is what I came up with :)


For those of you who haven't heard of or watch Adventure Time, it is an animated show on Cartoon Network, and it is not just for kids! I chose to paint the two main characters (Index and Ring fingers) and two of my favorite reoccurring characters (Middle and Pinky). I will list the products used by finger, along with the tutorial! Let's get started!  

Ring finger (Finn):

Polishes used:

Sally Hansen - Brisk Blue and White Out Orly - Liquid Vinyl The nude is actually a bolivian brand, but any nude would work :)

Tutorial!

This design is probably the easiest out of the characters. Start with a base of white polish. Paint the tip blue, using either the polish brush or a nail art brush. Using either the polish brush or a dotting tool, paint a nude oval towards the base of your nail, above the blue. The last step is to use a black polish and a nail art brush to add Finn's facial features, and to clean up the line between the white and the blue. I didn't do such a good job with the last step lol

Middle finger ( Lumpy Space Princess):

Polishes used:

Formula X - Outrageous Sally Hansen- White Out and Lemon Shark Orly - Liquid Vinyl

Tutorial!

Start off with a purple base. Lumpy Space Princess has a very iconic star on her forehead, so I chose to start off with that, since I feel it is the most important part. Paint a star at the base of your nails, you can go ahead and use yellow polish but I chose to use white first to give the yellow more vibrancy. If you chose to use white first, go back over it with yellow after the first coat dries. Next use a large dotting tool and a black polish to paint her eyes. Using a nail art brush, paint her mouth and eyebrows using black as well. LSP has many facial expressions, feel free to paint her smiling, smirking, or another emotion if you'd like! It is up to you! Since I chose to give her a sad expression, I added small white dots in her eyes to convey emotion!

Ring finger (Jake):

Polishes used:

Sally Hansen - White out and Lemon Shark Orly - Liquid Vinyl

Tutorial!

Start with a yellow base. Lemon Shark isn't exactly the right yellow, but it was the closest I had to Jake's actual color. Once your base is dry, use a dotting tool and black polish to create his eyes. This next step is pretty tricky. Using a nail brush, paint Jake's nose and mouth. This is a bit difficult, even I didn't get it exactly right. The final step is to use a smaller dotting tool to add white dots to his eyes. I think Jake is the hardest design out of all of them, he definitely has distinct features.

Pinky (Marceline):

Polishes used:

Zoya - Megan and Demetria Orly - Liquid Vinyl Sally Hansen - White Out

Tutorial!

Start with a light grey base. Using a black polish and a nail art brush, paint her hair, leaving a decent space in the middle for her face. Her hair frames her face, so I chose to let the hair define her face in this design. While it might be easier in theory to paint your nail all black and then add her face, I find it easier to start with the lighter color as my base. Using a small dotting tool, paint her eyes! Adding her mouth is the next step. I chose to paint her mouth red, but you could use black, grey, or any other color you think fits! Since Marceline is a Vampire, she needs some fangs! Paint them using a small brush and a white polish! This last step is completely optional, if you don't have space don't worry about it! The red dot on her neck was not a mistake, she has two bite marks on her neck (I only had room to paint one), so if you want, go ahead and add them using a small dotting tool! There you have it! What do you all think? If you recreate this mani, I would love to see! Tag me on Twitter or Instagram so I can see! I had so much fun putting this design together for you all! As mentioned above, I will be back to share another design and tutorial with you on the 28th! It was inspired by Victoria's daughter Alice! Any guesses about the theme?
-Posh Polish
   
post signature

Wednesday, August 19, 2015

housewifes whimsy hand + body lotion (a guest post).

today i have another wonderful lady taking over: stacie from Housewife’s Whimsy is here with a recipe for some homemade lotion with essential oils! this recipe looks absolutely fantastic and i hope i can get the spare time to make a batch sometime soon. but this is her recipe, not mine so ill let stacie take over now:

One of my favorite things to do is make homemade lotion. I’ve been doing it for some time now and I just love the way it feels when I put a fresh batch on my hands. This lotion recipe I’ve created is super silky, soft and luxurious. You will be in heaven once you try it out!
If you’ve made homemade lotion before you know that it can tend to be on the greasy/oily side. I’ve actually fixed that problem with this recipe! By adding a little bit of Arrowroot starch (or corn starch) you can actually make the lotion less greasy when you first put it on. It will absorb quickly into your skin and keep it soft throughout the day. The lotion has a thin consistency so it is perfect for spreading all over your body.
This recipe has been created exclusively for Poverty Luxe, but it is based on my favorite Honey and Shea Lotion. However, I have not included any coconut oil in this recipe since I know some people have allergic reactions.  This lotion is perfect for anyone with very sensitive skin. If you have trouble with fragrance or any essential oils you can simply omit this from the finished product. You will then have a wonderful unscented product to work with.  I’ve listed a few ingredients as optional, however if you omit them your finished product will not be as hydrating as this version. I also highly suggest using all organic ingredients since then you will only be putting only the very best on your body.
While I have a variety of essential oils on hand, I realize you may not. You can use any combination of EO’s you wish, you will simply need about 80 drops for this recipe. I’ve created a blend specifically for Poverty Luxe and this recipe below. It is a bright citrus based fragrance with notes of eucalyptus and clove bud.  This is one of my favorite EO blends to date, the only other one that even comes close is the blend for my Eucalyptus Citrus Body Butter. Depending on what you prefer, or any allergies you need to consider, use whatever blend works for you.
Homemade lotion will last for about three months at room temperature. If you keep it in the fridge you it will have a slightly longer shelf life, but not by much. However, this recipe makes the perfect amount of lotion, one for you and one for a friend! It is also a great way to reuse those mason jars you have laying around from other projects. Just simply make sure they have been sterilized before you use them for lotion, otherwise it will cut down on the shelf life. I personally like to glue some decorative paper to the tops of the lids to make them a little more beautiful.
Housewife’s Whimsy Hand & Body Lotion
1/3 Cup Grapeseed Oil
1/3 Cup Sunflower Oil
1/3 Cup Sweet Almond Oil
¼ Cup Beeswax
Optional:
3 Teaspoons Organic Honey with Honeycomb
4 Teaspoons Vitamin E Oil
4 Teaspoons Shea Butter
6 Tablespoons Distilled Water
4 Tablespoons Arrowroot Starch
80 Drops Essential Oil
Special Poverty Luxe EO Blend:
20 Drops Lemon EO
20 Drops Sweet Orange EO
10 Drops Tea Tree EO
10 Drops Clove Bud EO
10 Drops Eucalyptus EO
5 Drops Frankincense EO
5 Drops Myrrh EO
Combine the oils, beeswax, honey, vitamin E oil, and shea butter in a medium saucepan, set over low heat.

Gently stir until the beeswax has melted.

Remove from heat and pour into a large bowl. Pour in the distilled water and arrowroot starch.

Using a hand mixer, mix together the oil and water until it resembles lotion.

Let cool to the touch then gently stir in the essential oils.
Once the lotion has completely cooled, spoon it into clean jars. (This recipe will make approximately two 8oz containers.)

Spread liberally over your hands and body and enjoy!

Pro tip: Have a specific saucepan, mixing bowl and mixer to use for making lotion. It is incredibly difficult to get these items completely clean so having ones specified for this use will prevent cross contamination with food.

Stacie LaMoore has been blogging at Housewife’s Whimsy since November 2014. Her blog contains a variety of topics including Gluten Free recipes, natural body and home ideas, and most importantly, cupcakes. She lives in northern Iowa with her husband, dog and cat where there isn’t much to do other than bake and watch the corn grow. She loves reading, kayaking and everything related to baking.  She’s very excited to have this chance to share a little of her life with you!


post signature

Friday, August 29, 2014

why my hair is still so long and glorious (even after i bleached the crap out of it)


if i were to pick the number one thing i get the most comments/questions about from curious strangers (and especially hairstylists), hands down id have to say its my hair. actually, now that i get to thinking about it, my hair has been much more perplexing to strangers since its been long and blonde than it ever was when it was, say, blue. 

i get asked if its my real color (oh heck no, im half asian, its almost black), if its all mine (no extensions here, my hairs actually too thick for them to clip in without looking stupid), how i do it (just regular old bleach powder and 40 volume developer at home), if i spend a lot of money on it (nope, only about $30 a year), but mainly i get asked this: "HOW?!? how is your hair still so long and shiny after you bleach it? i thought you were never, ever supposed to bleach your hair like that because everything anyones ever said about beauty is that bleaching your hair turns it into straw". 

well, today im going to elaborate a little on why exactly my hairs the way it is (and consequently, why just about everything youve ever known about hair care is wrong). so why is my hair so long and glorious even after i bleached the crap out of it?

(disclaimer: this is absolutely NOT an advice or tutorial post and i am NOT a licensed cosmetologist and do NOT expect to do anything i say and expect it to come out perfectly because "victoria said it would work". no, im just sharing what i do with my hair)

a few reasons, mainly: 

1. genetics. i may be half asian, but my hair is 100% asian. asian hair has a thicker, flatter cuticle layer thats harder to damage. obviously im taking serious advantage of that. 

2. i only bleach the roots. this is the MAIN difference between me and most folks who regularly change the color of their hair. i ONLY bleach the new, fresh, undamaged hair at my roots, NEVER the parts that have already been bleached. when you bleach (or color) over color (or bleach) your hair gets more and more fried. i dont do that. 

3. i go a LONG time between touch ups. i wait till my roots are at least an inch long (usually takes 3 months or so), so my hair is rarely exposed to the bleach chemicals. 

4. i rarely brush it. brushing your hair (especially when its long) speeds up breakage, so i only do it when ABSOLUTELY neccesarry. and i never, ever brush it wet (thats like the worst thing you could ever do to damaged hair). 

5. i wash it even less. washing your hair with shampoo strips it of the natural oils that keep it strong and healthy. i wash my hair once a week. sometimes i can get away with less. while im definitely not part of the "no poo" movement, im very anti-washing-your-hair-everyday. 

6. i dont use heat tools. aside from my weekly blow out, i dont use any other heat tools. i dont even own a flat iron or rollers, and i only bust out my curling iron for very special occasions. 

these six things work together to keep my hair (relatively) healthy so that it can grow absurdly long despite my incessant bleaching. 

how do you keep your hair healthy? do you have any unconventional hair tips? id love to hear about them in the comments!

Tuesday, March 25, 2014

my jamberry business launch party ( + a giveaway!)

remember last week when i announced my new business adventure (a term i just coined that you are more than welcome to start using and make a thing) as a consultant for jamberry nails. and i didnt really say much more than that because my official business launch was for another day. 

well today is that day! my facebook business launch party has been going for a couple days now (thats how jamberry does things, real life parties and facebook parties), BUT the lame thing about facebook events, is well, i can only reach the folks that im friends with on Facebook and its really, really difficult to reach a wider audience (which is truly a shame because as far as im concerned, jamberry is the second best thing ever, after cheese, obviously). so, im inventing something right now: blog parties for jamberry nails

as far as i know, this is the first one thats ever happened (jamberry is still a baby company, only about three or four years old), so im kind of making this up as i go, BUT i think its going to be really fun. heres how its going to work:

first, im going to take a few minutes to tell you about what jamberry nails are, what makes them so awesome, and why i love them so much. second, im going to talk about all the ways that YOU can get in on the jamberry action (more options than you think). and last but not least, im giving away a FULL SHEET of jamberry wraps to one lucky winner!!!! so stay tuned to the end because you definitely dont want to miss that. 

alright, so lets get started: 

what are jamberry nails? well heres a handy little graphic that has everything you need to know:


now, let me reiterate a few of my favorite key points:

1. theyre heat and pressure activated vinyl nail wraps that cause NO damage to the natural nail. unlike acrylic and gel nails, you DONT have to sand the nail bed in order to get them to stick. 

2. there are something like 300 different jamberry wraps so there is literally something for everyone. also, new designs are added with every catalog AND if youre the artsy type, you can design your own jamberries in the nail art studio

3. they last for-freaking-ever. the "lasts up to two weeks on fingers" statement? thats actually a very conservative estimate. let me show you. heres a picture of my nails right after i did them:


and here they are yesterday (ELEVEN days later!), still perfect (this is an especially big deal for me because regular nail polish lasts literally one day on my nails):


4. they are super simple to apply and in about 15 minutes you can have total pinterest nails (with the added bonus of no mess or risk of wrecking them before they dry). heres the official video of the application process:


5. they are way, way cheaper than getting your nails done at a salon. each jamberry sheet cost roughly what you would pay for ONE very basic manicure at a salon. but heres the thing, each sheet gives you AT LEAST two pedicures AND 2-3 manicures. CRAZY. it gets even better though, jamberries are ALWAYS buy three, get one free. meaning for less than $50, you get EIGHT pedicures and EIGHT TO TWELVE manicures. im serious. what does this come out to per application? thankfully somebody else already did the math for me:


(and thats totally not counting all of the leftover bits you can save to mix and match later)

so youre totally stoked on jamberry now, right? and youre all like "tell me how i can get them!"? of course you are. and the answer is simple, just place an order through my jamberry page, and it will be shipped directly to you, none of the usual direct-sales middleman nonsense. its fantastic. (oh, and if youre feeling skeptical and want to give jamberry a try before committing to an order, just shoot me an email at wifeofmeyers@gmail.com and ill get you some samples). 

but wait, you want more? you want to tell everyone you know about jamberry and score some FREE jamberries? host a party! just hit me up and we can make arrangements to do your party on facebook, on your blog, OR (if you happen to be in the la/oc area) in real life. its really up to you!

oh, is that not good enough for you? are you (like me) totally obsessed with jamberry and want your own piece of the action, making money AND earning free product by selling a ridiculously awesome product (that honestly, basically sells itself)? become a consultant! like i said earlier, jamberry is a little, baby company, and there really arent a whole lot of consultants (especially on the west coast, there are currently about 50 reps in all of southern california), so now is DEFINITELY the time to get involved. 

so lets do a quick review here:

1. jamberry nails are the awesomest.

2. $45 gets you four whole sheets (basically a lifetime supply of adorable nails). 

and 3. if you want even MORE, its totally easy to host a party or become a consultant


oh, and one more thing, to celebrate my business launch with all of blogland, im giving away a FULL SHEET (two manis and two pedis worth) of my favorite black and white chevron design


a Rafflecopter giveaway
have you heard of jamberry nails before? what do you think? do you have any questions? ask away in the comments!

Thursday, June 13, 2013

little treats. free eyeshadows.


if you had asked me a few months ago, i would have told you that  most drugstore makeup isnt worth the money, especially eyeshadows. the reason being that with the drugstore shadows, (at least in my experience) what you usually end up with is a low quality base that creases and fades in a matter of minutes, with hardly any pigment, meaning you have to use tons of product and re-apply throughout the day in order to keep it looking presentable. on the other hand, for just a few extra dollars you could invest in a quality product (my favorite has always been mac) that is mostly pigment, and be able to use a teeny-tiny bit of product and have it stay put ALL DAY (and sometimes even two days, not that ive ever done that...). 

now i am all about quality over quantity, and ive worn my makeup the exact same way since i was like 14, so most of my makeup is just a small, carefully selected collection of higher-end products. since it only takes a teensy bit to get the job done, and almost never needs touched up, i literally dont even remember the last time i bought eyeshadow. i was mostly ok with that, since i had found what worked for me for everyday wear. 

i got kind of bored, and wanted to try something a little different, and i looked at lots of pallets online, or at sephora, but since im a total makeup snob anything i deemed worthwhile was waaaaaay out of our price range. but then when i started couponing i noticed that sometimes, eyeshadows (but for some reason, only eyeshadows) are completely free. and im totally willing to try something that might not be so great if its free. 

a couple months ago there was a $4 off almay manufacturers coupon, and a $1 off printable target coupon for any almay eye product and these pallets are only $4.99, so i got the purple one on the left. and while it certainly isnt the superpowered makeup im used to wearing, but its still pretty great. its not as pigmented as id like, but i really like the colors together, and its a nice change to my normal "everyday" eye. i really like though is how all three colors are in a single small compact, and i dont have to juggle a whole bunch of seperate pots like i do with my other shadows. also, the texture is really nice and it holds up for most of the day without creasing (which may not even be a problem for most people because my skin is SUPER oily). overall im pretty happy with it, and i was hoping that the $4 off coupon would be printed again (it happens more often than youd think). 

then two weeks ago (or was it three? im not so good at remembering anymore), it did! i could get another one! for free! i really wanted to branch out try something different, so i got the silver one on the right, since ive never really been able to achieve a smoky eye on my own. and that one, i REALLY like, it has just the right amount of shimmer and seems to have more pigment than the purple one. 

this is totally something i would have shied away from trying if they werent free, and im really glad these coupons came around, because these eyeshadows are actually pretty great. and maybe ive changed my mind a little bit about drugstore makeup. maybe. 

stay tuned for next week, ive got a really cute tutorial in the works!


Saturday, May 25, 2013

little treats. a new nail polish.

over the past couple months ive been working REALLY hard at taking better care of myself and my appearance (read more about that here). and ive started to feel like ive made really good progress in things like putting on makeup, wearing real clothes, and brushing my hair more than once a week. so much so that those things are starting to feel like a natural part of my day. so the time felt right to move on to a bigger challenge: buying myself treats. 

now i know this should not be nearly as difficult for me as it is, but look, weve always been broke, and ive always had something id rather spend our money on and ive never really felt like i deserved it. so ive been working on it, but the thing is, ive gone so long without buying myself treats that i dont even really know what kind of treats i even like. 

ive been feeling really crappy for the past couple weeks with my new diet, and havent been able to go out and do much, so i REALLY needed a little treat. thing is, my favorite treats are the food kind, but with all my new ridiculous food allergies, theres not a lot i can do in that department. also, james had school this month and my job is basically nonexistent these days, so were extra extra broke. i needed to find a really REALLY little treat. 

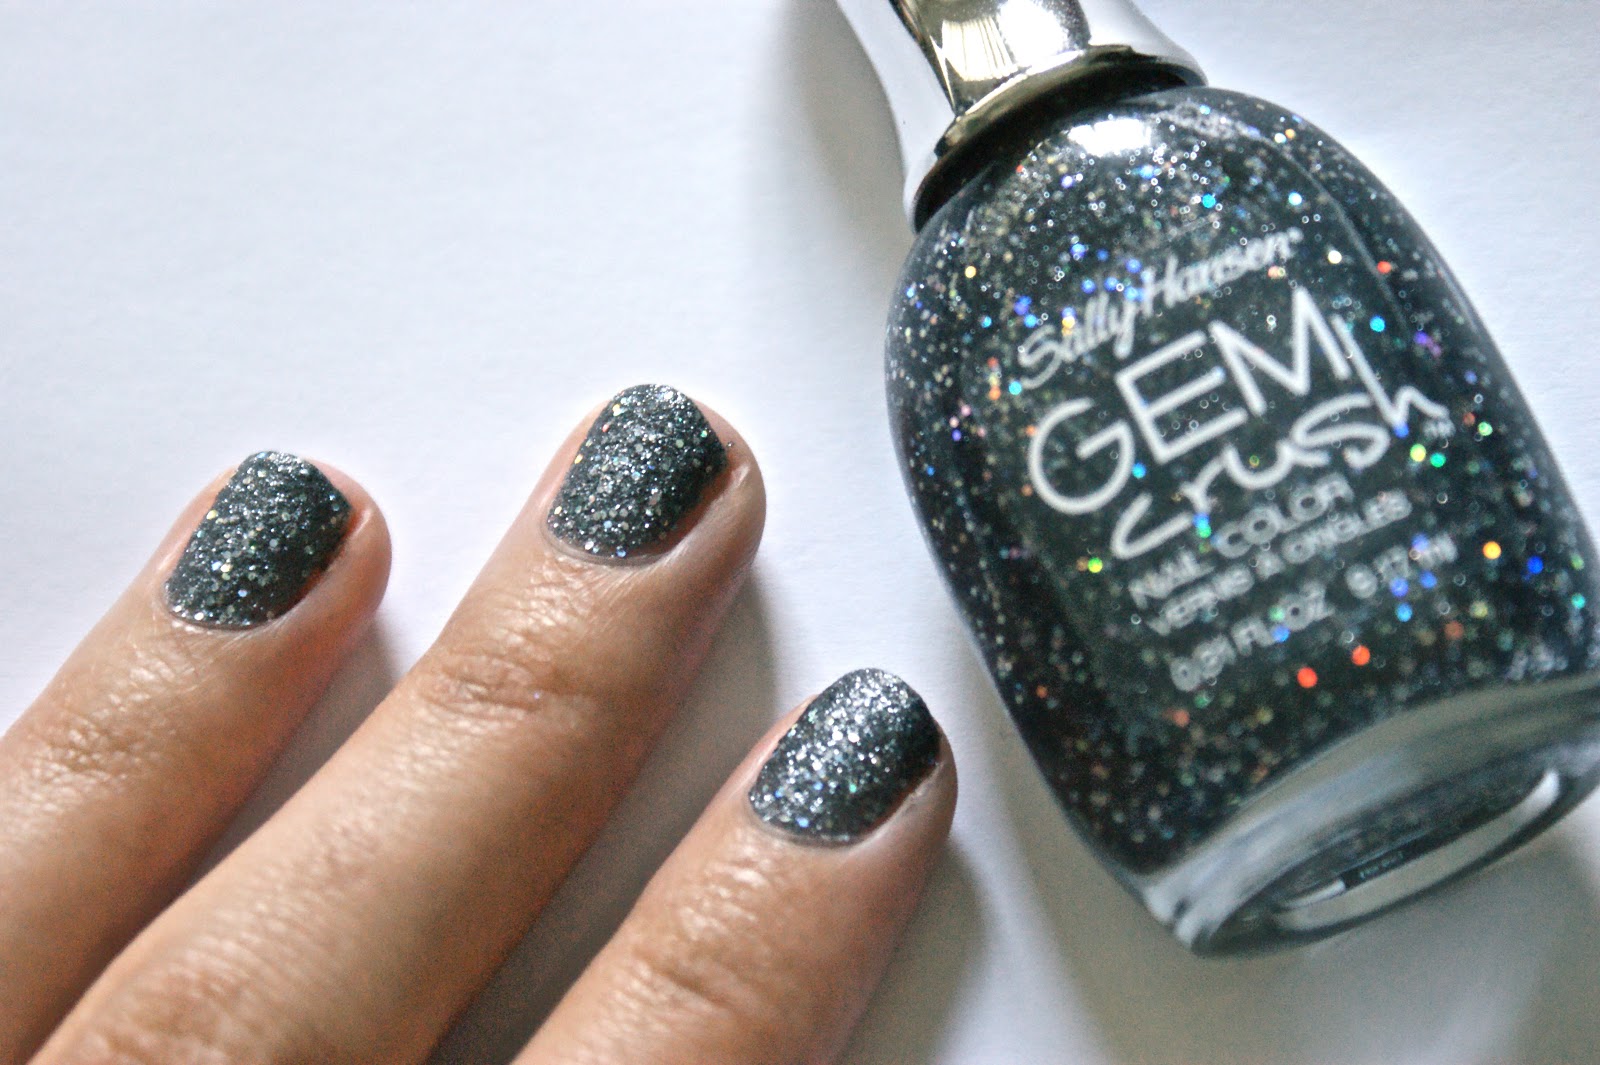
so i picked up a new nail polish last time we went to target. i got a new one that i havent tried before, sally hansen gem crush:


it was on sale for $5.61, and i had a $4 off coupon, so $1.61 seemed fair for a treat, especially since i stopped drinking soda and wasnt spending money on that anymore. i was really intrigued by the displays claim of "full coverage glitter", because thats EXACTLY what i want in a glitter polish. i was REALLY happy with how it came out:


two coats did make for really great full coverage glitter, and i totally love the color. the only thing i dont really like is the super rough texture, it really needs a topcoat, which i dont happen to have. it also chips off in big chunks, but thats really more my fault than the polish, im REALLY hard on my nails, so no manicure (except the one time i got a really, really expensive gel manicure for my birthday) ever lasts more than two days, so im not complaining. i LOVE it on my toes though, it may be my favorite for the summer. 

im thinking this might be a new regular feature, the little treats i find. 

anyways, stay tuned for next week when i share a new craft tutorial!

Thursday, May 23, 2013

my hair.

im sure youve put it together that my hair is not naturally bleach blonde. in fact, its quite the opposite. i havent actually seen more than an inch of it in almost a decade, but given that as a child my hair was dark brown, and hair color typically darkens with age, my best guess is that my natural color is somewhere just north of... black. 

now i know that youre supposed to re-touch your color ever 6 weeks or 1/2 inch to avoid visible roots, but honestly i dont think that rule really applies when your hair color is this obviously fake. i mean, im not trying to fool anyone into thinking that my hair anything other than fake, and i completely use this as an excuse to stretch re-touches as far as i possibly can. personally i like to have at least an inch of regrowth before i even bother with the roots, but my hair is really thick and grows on the faster side, so i can only  get away with putting it off for two and a half months maybe three. 

anyways, i know its time to do my roots when my mom says "victoria its time for me to do your roots", because, its my mom that does my hair. at home. its what weve always done. with the exception of the few months that i worked as a salon receptionist, ive had my color done at a salon exactly once. 

coloring hair at home isnt nearly as difficult or dangerous as its made out to be and when done correctly it can save you A LOT of money, HOWEVER, you do need to do A LOT of homework and learn about how the different chemicals react to each other and why. honestly if you think youre going to go to rite aid and pick a box of clairol dye thats even a little different than your existing color and have it come out exactly like the picture on the box you are most likely going to be disappointed. at the same time, going to a stylist doesnt necessarily guarantee perfect results either, since not all stylists specialize in all kinds of color processes (and no stylist would ever admit that). 

after years and years of trial and error (and my brief stint at beauty school) my mom and i have formed a tidy little method for doing my roots, and i thought id talk about how we do it, but before that i have to give a big fat disclaimer:

*my mom and i are not professionals. this is not a tutorial with any kind of guaranteed results for anyone other than me. this is what WE do and it works for ME, thats all. these ARE professional products that CAN be super damaging to the hair even if used correctly. technically, what we do is SUPER risky and ive even had stylists tell me that i shouldnt be able to do this.*

with that out of the way, these are the products i use:


im not particularly loyal to any particular brands, i just buy whats on sale at sallys, but i always use powder bleach and 40 volume creme developer (when i was in beauty school i used 50 volume). the bleach comes in a one pound tub and is usually somewhere around $20, but theres usually at least one brand on sale for as low as $15 (this loreal is usually around $30, but it was on sale for half price, and so far its my favorite). the developer comes in a clear liquid and a creme, and even though they do exactly the same thing, i prefer the consistency of the creme, and is about $6 (sometimes on sale for $4.99) for a 32 oz bottle. 

the bleach powder usually lasts me well over a year for root touch ups, and the developer not quite as long, so they never run out at the same time. but hypothetically even if i had to buy both at regular price, id be out the door for less than $30 with enough product to last  the ENTIRE YEAR, as opposed to paying a minimum of $40 + tip four or five times a year (and thats if i went to like, fantastic sams. a real salon would be more like $60+, and this type of bleaching isnt really popular anymore, so not a lot of stylists even know how to do it right). really, if i wasnt able to color my hair at home, i WOULD NOT be able to afford it, $30 a year i can do, $40-60 every few months? at this point i cant even IMAGINE how much money youd have to have to be able to do that. 

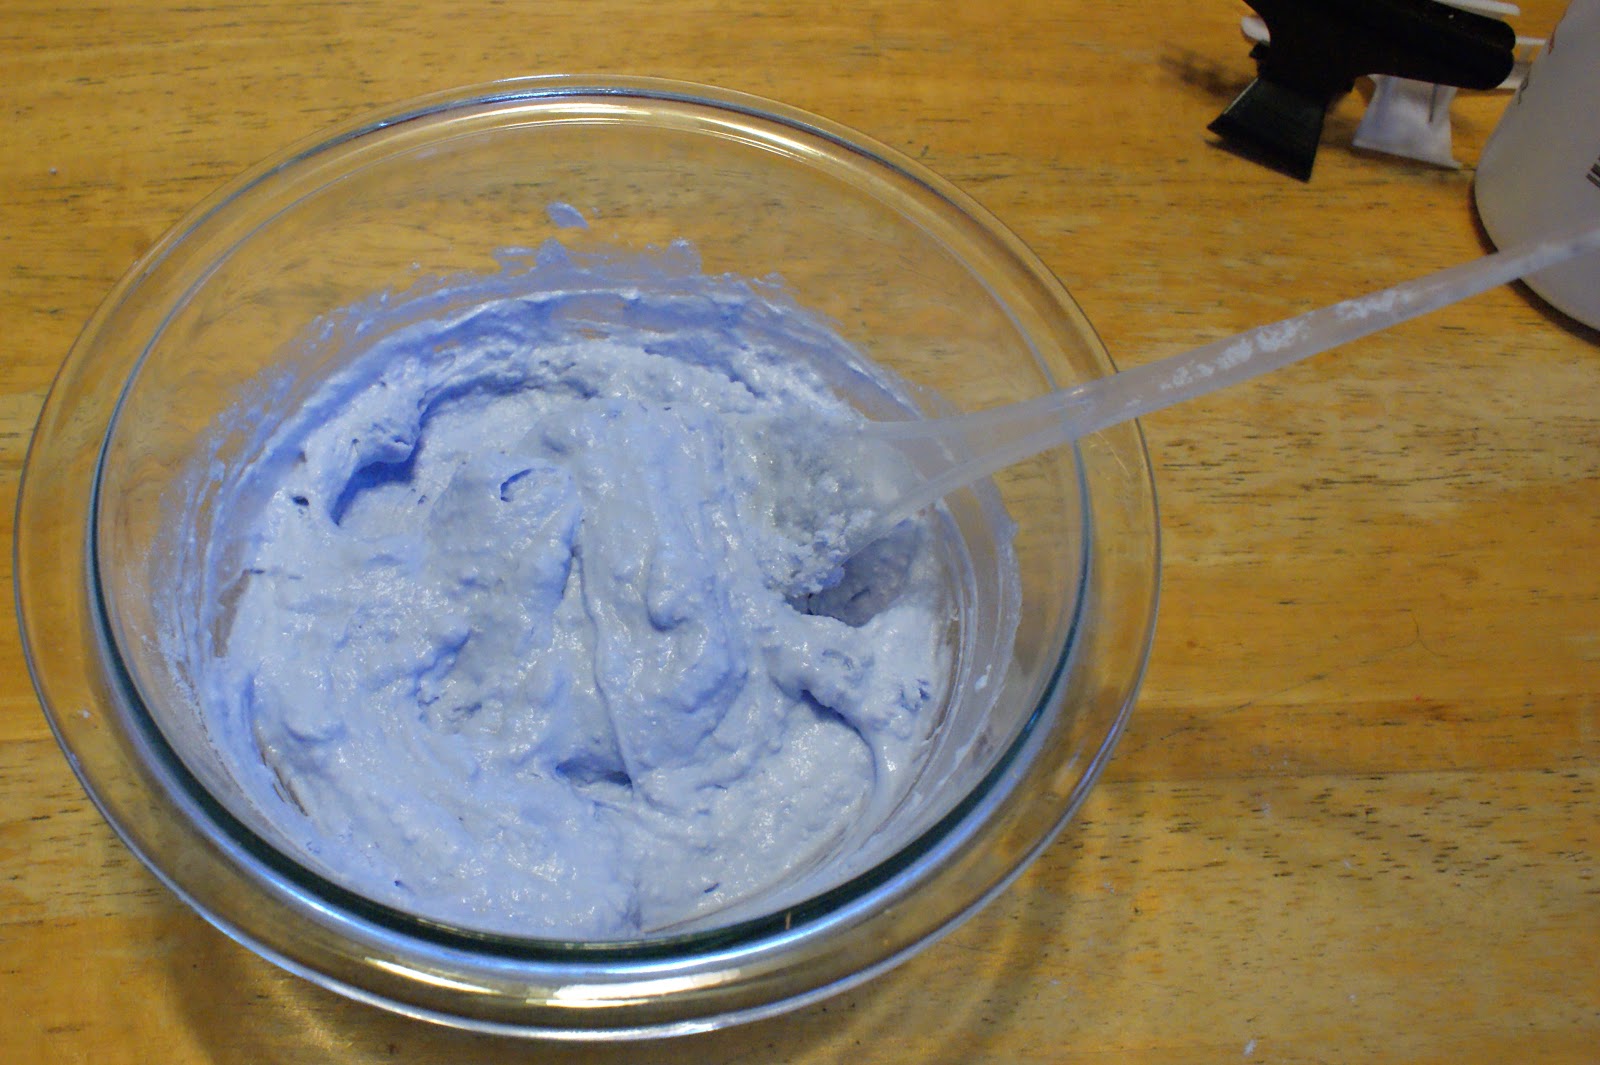
anyways, the bleach and developer get mixed into a paste:


and carefully applied to the roots only. lots of people believe the myth that bleaching COMPLETELY ruins your hair, and while that certainly can happen, the real culprit isnt the bleach itself, but the re-bleaching of already bleached hair. once its all on, the ammonia in the bleach needs time to oxidize and "lift" the color out. since im going for maximum lift (in stylist speak, im going from a 2 to a 10), i leave it on until the bleach stops reacting completely, about 20 minutes, which is entirely too long to walk around looking like this:


once thats done, i just rinse the bleach out (though i always miss some, no big deal), condition REALLY well, blow dry, and ta-da! no more roots:


its kind of a lengthy ordeal (about two hours start to finish), so im always REALLY glad to have it done so i can go back to avoiding it for the next three months.